Speaker stand setup is a little more complicated than many people realize. This guide will help you get better sound out of your system and better safety for your dancers.
Tripod Leg Position
The first consideration in setting up a tripod speaker stand should be safety; safety for both the equipment and the dancers. The goal is to avoid having the stand fall over, and avoid tripping hazards with the tripod legs and cables.
The following illustrations show three possible positions for speaker stand legs. The most important difference to notice is the position of the linkage arms between the legs and the center post.

The position shown on the left is the optimal position. The legs are extended to a point where the linkage arms between the legs and the center post are horizontal. In this position, the legs extend out as far as they were designed to go. This gives it the widest base possible for maximum stability.
If there is not enough room to fully extend the legs, the center image shows the next best position. Notice that the linkage arms are pointing down toward the center post. This position brings the legs in closer to the center post, taking up less floor space. Any force applied to the stand is directed down toward the center of the tripod. Another reason to use this position is to get a lower speaker height since it sets the center post at it’s lowest possible position. You might need this if the speaker stand is on a stage or riser. Avoid setting the legs at an angle steeper than 45 degrees to prevent the stand from falling over.
Do not setup the speaker stand legs in the position shown in the image on the right. This is often done to get the center post and speaker as high as possible. This is the worst possible setup, and it is dangerous.
In this position, the legs are at a steep angle, which makes the tripod less stable. This creates a greater risk for the speaker stand to fall over. Also, any weight, or force, on the speaker stand can easily move linkage arms, causing the center post to drop suddenly. This can happen due to the weight of the speaker itself, or someone grabbing the center post. Do not count on tightening the pressure block knob for the legs to prevent this from happening. Very few pressure block designs can apply enough force to prevent this from happening. If you can not get your speakers high enough, buy taller stands or put the stands on a riser.
Pressure Blocks
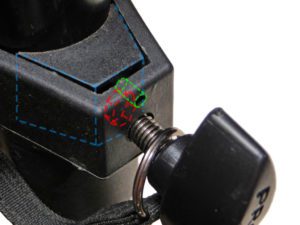
Tripod speaker stands usually have two pressure blocks, tightened by hand using a knob attached to an internal screw. These are usually made of plastic, with a metal tightening screw and bolt inside. Some designs also have an internal metal slide pin to keep the plastic parts from rotating when tightening the knob. See the illustration to the right.
The pressure block at the center post slide is designed to prevent the center post from rotating. Do not use it to hold up the center post; use the locking pin for this purpose. Some people try to get a little more height out of the speaker stand by extending the center post higher than it was designed to and over-tightening the pressure block to hold it in place. This will eventually destroy the pressure block’s plastic pieces, and increases the risk of the speaker stand falling over.
Another pressure block is located on the leg adjustment slider. Do not rely on this pressure block to keep the legs from moving; no matter how much pressure you apply by tightening it. Over-tightening this pressure block will eventually damage it. Instead, rely on proper tripod leg position as outlined above.
Locking Pin
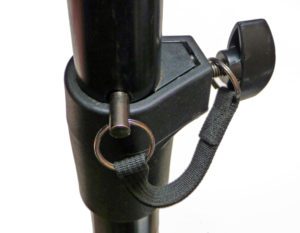
After the tripod legs have been properly set up, extend the center post slide to the desired height. Then insert the supplied metal locking pin in the post hole closest to pressure block. Always allow the center post slide to rest on the locking pin. Never rely on the pressure block to hold the center post at a different height position. Doing so would create a hazard which could result in post suddenly dropping and the speaker stand falling over.
Speaker Position
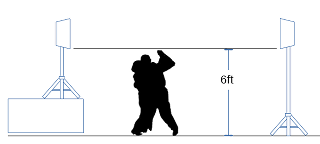
Set the bottom of the speaker case to 6 feet (1.8 meters) above the dance floor. This will allow better dispersion of the sound by having the speakers above the height of most dancers. If the speakers are any lower, the bodies of the dancers passing in front of the speakers will block, absorb, and scatter the sound near the speaker. This will also reduce the amount of sound reaching the other side of the room. You will also annoy dancers by hitting them with the full volume of the speakers as they dance past them.
If the speakers are much higher than 6 feet above the dance floor, find a way to mount the speakers so they can be angled down toward the dance floor. This will help high frequency content of the audio (treble) reach the dance floor; since higher frequencies do not disperse as well as lower frequencies.
Placing speakers close to a wall or room corner may cause low frequency audio content (bass) to be boosted at some frequencies and cut at other frequencies. The resulting distortion is often described as “boomy” or “muddy.” If there is no way to avoid this, the DJ can try reducing the bass. But it is often the case that an equalizer can not fix this problem. A possible solution is to hang some sound absorbing material behind the speaker, such as thick fabric drapery. Hotel venues often have sound diffusing fabric panels on the walls for this reason to help improve sound quality in the room.
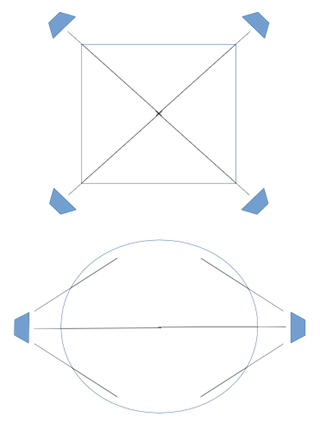 As a general rule, you want the speakers to be near the corners of the dance floor and aimed toward the center of the dance floor. Long dance floors may need additional speakers at the middle of the long sides of the dance floor. These will reinforce the sound in the mid-section of the floor and the dancers won’t hear large variations in volume as they move around the large floor.
Safety
When thinking of safety, never assume that people at your event will behave safely at all times. With each piece of equipment you set up ask yourself, “What is the stupidest thing someone can do to hurt themselves or damage this equipment?” then try to prevent that from happening. With enough experience, you will find that you may have underestimated how thoughtless and unsafe people can be. It is your job to keep them out of harm’s way.
Speaker Stand Legs
Keep tripod legs out of the way of foot traffic as much as possible. One strategy is to surround tripod legs with tables, immovable decorations, or some other kind of highly visible obstacle.
Try to make sure whatever you use to block the area around the tripod legs is as immovable and inaccessible as possible. Dancers, desperate to get on to a crowded dance floor, have been known to squeeze and contort themselves around speaker stands, creating a tripping hazard and possibly knocking over your speakers.
Avoid using chairs to block tripod legs. The temptation is too great for dancers to either sit in the chair, or move the chair somewhere else, leaving the tripod legs exposed.

Another strategy to keep people away from tripod legs is to use speaker stand skirts or “scrim.” Scrim for tripod speaker stands are made of a stretchy, Spandex-like material that have pockets to tuck the legs into. They are attached to the center post by adjustable Velcro strips or tie-wraps. These are usually available in black, or translucent white like the one in the illustration to the right. The translucent white scrims can be illuminated with light from inside to make them more visible. LED lights are recommended to keep heat generation low.
The goal is to make the speaker stands a highly visible and obvious tripping hazard so the dancers avoid it.
Speaker and Power Cables
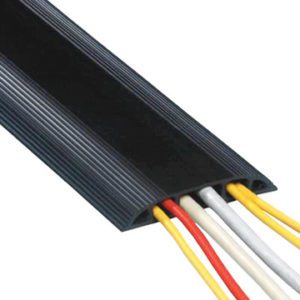
Keep speaker and power cables out of the way of all foot traffic. This means routing where people won’t walk; or covering them in a way that will not damage the cables and will not be a tripping hazard. Taping down cables with Gorilla Tape, or covering them with rubber mats, might be good enough for light foot traffic areas. But for heavy foot traffic areas, consider more robust cable protectors like the one in the illustration shown here.